
Around the House: Rain Gardens
Spring is coming fast now, and it’s time to start planning the gardens we’ve been dreaming of all winter. Garden catalogs have been arriving at our house thick and fast, and my three-year-old pages through them identifying the plants he’d like to have in his garden (hint: it’s pretty much all of them). Each year my wife tries to add a little to the garden beds in our yard, which were a solid mass of grass, trumpet vine, and nightshade when we moved into the house. Of course it’s a bit too early, and still too wet and slushy, to start in earnest, but we’re always considering what we should do for our next project. This week, as we navigated the death trap that was our driveway, sliding over sheet ice and into slightly greasy sludge puddles on our way to our detached garage, the reality of water as part of Minnesota’s climate was literally hard to avoid. There was nowhere for the water to go, so it pooled deeper and deeper until it finally ran down the driveway to the street, carving deep channels in the ice before finally finding a storm drain. This was not particularly nice water, and as much as we wanted it out from underfoot, we didn’t love the idea of it running into the river with its technicolor oil slicks and promise of antifreeze and heavy metals. So this year we’re considering creating a rain garden to keep more water – and the things it carries – contained.
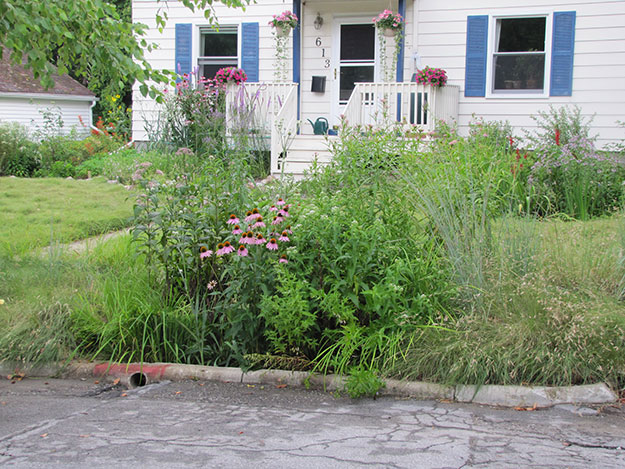
Rain gardens are essentially natural catchment systems for potentially polluted rain and meltwater. Planted near downspouts or in low lying areas where water naturally collects (which you can find by sending your son outside with instructions to keep his shoes dry or can create yourself), they are designed to absorb runoff quickly and filter it on its way back to the water table. According to the Mid-America Regional Council (MARC), a rain garden can absorb 30% more water than an area the same size planted with grass, and when planted correctly, they can be extremely effective. The Ramsey-Washington Metro Watershed (RWMW) reports that rain gardens can trap as much as 99% of common pollutants like fertilizers, heavy metals, sediment, and oil, as well as other chemicals like nitrates, ammonias, and phosphorus. They also help to prevent flooding and both the damage to structures and erosion of stream beds that floods can cause.
Rain gardens can have a major impact, economically as well as ecologically. Since 1996, the city of Maplewood has implemented a rain garden program that has resulted in some 700 home garden rain gardens and 60 rain gardens on city land, most of them installed by the city during redevelopment and planted and maintained by residents. Early in the project, a University of Minnesota study estimated that the city had saved $13,000 by investing in rain gardens rather than conventional gutters and piping in just a two block stretch. The project, over the years, has also had a significant impact on local ecology. Not bad for a city of 40,000.
On a much smaller scale, individual home rain gardens can also have an immediate impact, and they’re not that hard to create. The first step is to find an appropriate location. Ideal spots include areas downhill from paved surfaces, existing low spots (but not where it actually pools, since the soil is likely too dense to handle a rain garden without some serious amendment), and places where downspout extensions can funnel water directly to the garden area. Areas with partial or full sun are generally better than fully shaded areas as well. Do make sure that the area is more than 10 feet from your house so you’re encouraging water to infiltrate the ground rather than your home’s foundation. You want water to flow down into the rain garden, but in general moderate slopes and mostly flat areas are better than all-out hills, where the water won’t have a chance to find the garden or soak in during its headlong tumble to lower ground.
 Once you’ve selected a spot, you’ll need to work on infrastructure a little. Start by digging a depression about 4-8 inches deep. Make sure the sides slope gradually, and if you want the garden to store water a bit in drier periods, dig a bit of it deeper, up to about 18 inches. If you’re building on a slope, the depth of your dig site will depend on how steep the slope is, with steeper slopes requiring deeper digging than shallow slopes, since you want the garden itself to remain level. The idea here is that you want water to flow into the garden but not out again. As with any digging project, make sure you’re not going to hit any utility lines by calling Gopher One at (800) 252-1166.
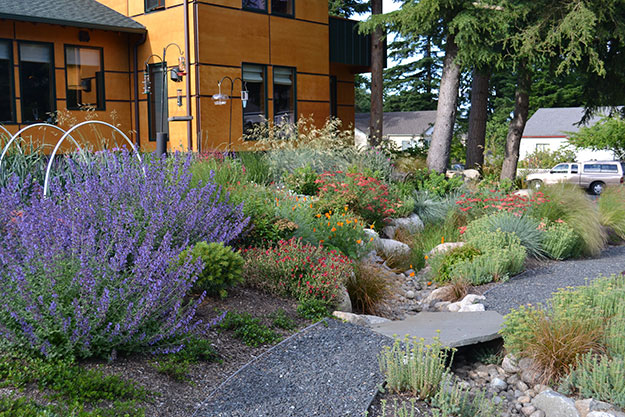
Next is the fun part: selecting plants for your rain garden (if this doesn’t sound like fun to you, I have a three-year-old who would be delighted to help). It can be tricky to find the right plants, and it’s worth some careful consideration. Experts recommend native plants for a number of reasons. They’re already adapted to our climate and conditions, so they tend to be hardy and require little care once they’re established. They can handle periods of standing water, but they’re also somewhat drought-resistant, so watering them won’t be a big issue. Many have deep roots, which will help with water absorption and movement through the soil. They also don’t need fertilizer, allowing you to spend less on them and not contribute to the problem of fertilizer runoff (one of the problems rain gardens are meant to address in the first place). After the first couple of years in which they’re getting established, they’ll also be able to fight off most weeds, reducing the amount of work you’ll need to do to maintain the garden. If you’re not sure what’s native around here or what you might want to plant, the Minnesota DNR has a wonderfully searchable native plant encyclopedia to help you. If you want a quick look at some of the possibilities, check out blue-thumb.org’s Native Plants Brochure or Prairie Restoration, Inc.’s list of native plants they recommend for rain garden conditions. Local nurseries can help you choose as well, and there are even a few that specialize in native plants.
Once you’ve planted your rain garden, make sure that you place shredded hardwood mulch around them, covering all the bare soil to a depth of 3 inches, to protect them while they mature. It’s usually good to mulch the second year as well, but it’s not necessary after that unless you just like the look. For the first two or three weeks, you’ll also need to make sure they get water regularly, about every other day. That’s really all the maintenance that’s required – the native plants will take it from there.
So if making a rain garden is fairly easy and allows you to shop for new plants, why don’t we see more of them around town? Like any garden project, they do take work, and not everyone has the time or the interest. Or has heard of rain gardens. Beyond that, people’s main concerns seem to be expense and the potential for creating extra mosquito breeding grounds by creating an intentional low spot for water to flow into. Neither is the problem people think it is. The cost of installing a rain garden is about the same as the cost of installing pretty much any other kind of garden area near your home. It may take more digging, but the plants aren’t any more expensive, and in the long run they’ll require less care (they’ll rarely need watering, and fertilizing is actively discouraged, since the recommended native plants actually do better without than with it) than grass or other garden types. If you want some idea what a rain garden would cost in your yard, blue-thumb.org has a cost calculator that can give you a ballpark figure (it actually gives a freakishly precise figure, but of course personal choices will change the total).
Mosquitoes also aren’t really a concern, either; in fact, I like to imagine rain gardens as a cleverly conceived plot to convince mosquitoes to lay eggs in a place where they’ll never produce actual mosquitoes. Mosquito eggs take one or two days to hatch, and then the larvae need another week to ten days to become pupae and then adult mosquitoes. Rain gardens, while they might look like convenient places for these evil devil bugs to spawn, are designed to drain in 48 hours or less, drying out any larvae and ending their bloodthirsty careers before they even start. In many rain gardens, there’s even a drain designed to clear out water above a certain level, ensuring that the ground will actually be able to absorb the remaining water in a timely, larva-destroying manner. If that weren’t enough, dragonflies love both the native plants of rain gardens and tasty mosquito dinners, so the rain garden could even help control the mosquito populations coming from other hatching grounds near your home.
If a rain garden sounds like it might be a good option for your home, there are lots of resources to help you out. This Tuesday, March 19th, the Cannon River Watershed Project is hosting a “Plant a Rain Garden Workshop” at the Northfield Community Action Center from 6-9PM. It costs $7.00, and in addition to learning more about how to plant rain gardens, you can find out about ways the city or county can help offset expenses through cost-sharing programs. If you’ve had some experience gardening and want a fairly detailed guide to take you through the process from beginning to end, check out the University of Wisconsin’s rain garden publication. For a quicker look, our friends in Maplewood have also created a guide.
So get out and enjoy the possibilities rain gardens offer for helping the environment, adding beauty to your yard, and entertaining yourself in the dirt this summer. Just wait for the rest of the ice to melt first.